Adding a 2D collider to your sprite in Unity is essential for enabling collision detection and physical interactions in your game. In this tutorial, we’ll walk you through the simple steps to add and adjust a collider, so your sprite can properly interact with other objects in the scene.
Select Your Sprite:
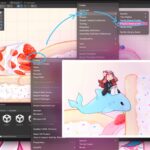
Click on the sprite you want to add a collider to. On the right in the Inspector panel, you’ll see various settings appear.
Add the Collider Component:
Click on “Add Component” in the Inspector. Select Physics 2D, and then click on Box Collider 2D or any other collider that aligns with your spire shape.
Adjust the Collider:
After adding the collider, you’ll see a green box with small lines around your sprite, representing the collider boundaries. If you want the green box (collider) to match the shape of your sprite more closely, click on Edit Collider in the Box Collider 2D component. Small squares will appear on the green box or your collider shape.
Click and drag these squares to adjust the collider’s boundaries to your desired shape.
Now, your object has a collider! This means the player or other objects cannot pass through it, as it now has a physical boundary.